
Nortel Adding NEw CO Extensiones/Lines
Feature ** 266344
Show Set – next to – add line
001 – copy to lines u need to add
Hit Next/Line 7 4 times
Repeat for each set you want to ring on
Category: Tech Talk
WARNING – Firefox Update NOT compatible with many web sites & camera systems
Posted on
Firefox has released an update to Ver 52 which has been causing many headaches. We have received many calls from customers stating web sites stop functioning or they have lost access to their cameras and/or they cannot install their Firefox plugins/addons.
We also were effected with similar issues. Only after many hours of trying to understand and repair this, we realized that the issues centered around Firefox’s latest update. Firefox is aware of this and has released an ESR (Extended Support Release) to rollback their changes for a time (yes eventually this fix will also not work). We have used this fix and it does not seem to effect bookmarks or other settings. Eventually, all addons and plugins will have to be upgraded and we are at the mercy of the respective manufacturers – hence when this ESR expires we either can no longer use firefox or we hope our manufacturers update their plugins and web sites – I an not confident about older camera systems being supported at this time.
If you experience ANY issues using firefox such as:
- You can no longer access your camera systems
- Web sites ask for plugins
- PDF viewer stops working
- Add-Ons in Firefox is empty
You need to do the following:
- Check your version of Firefox – Click on the top menu HELP – About Firefox. If you have Ver 52 Continue to the next steps
- Click here to download the FIREFOX 5.2 ESR I have this link going right to the English Version simply select the proper 32 or 64 bit – again you can tell which you have by the HELP button
- Goto your DOWNLOADS folder and RUN the fire fox update – usually named: FIREFOX SETUP 52.0esr.exe. This will usually be located in your DOWNLOADS folder.
- Continue with the STANDARD install of this update
- Once completed restart firefox
This should bring back your system to before the update – check your websites and camera systems.
If you experience any other issues, please contact us for help.
Preventing Good Emails from Going into your Spam Folder
Posted onDo you find that Outlook is incorrectly sending legitimate emails to your junk mail folder? Here are a few tips to help your junk mail filter work properly.
These tips are based on the Safe Senders List. The Safe Senders list is basically a list of email addresses (or domains) that you say should NOT be treated as junk.
Change Settings to trust emails in your Contacts list and to trust people who you have sent emails to
The first thing you need to do is to tell Outlook to trust email addresses that are in your Contact list. You can also tell Outlook to add people to your Safe Senders list anytime you send them an email (even if they are not in your contact list)
-
- Right click over any email in your Inbox.
- Click Junk and then Junk E-mail Options.
- Click on the Safe Senders tab.
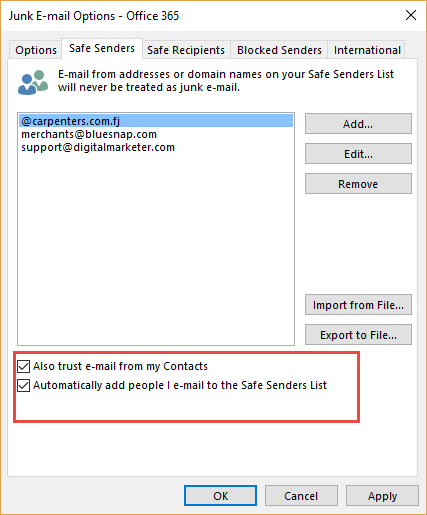
- Tick the checkbox to “trust emails from my Contacts”.
- Tick the checkbox to “automatically add people I email to the Safe Senders List”.
Add people who end up in the Junk Mail folder to the Safe Senders List.
You will still find that some legitimate emails may end up in the Junk Emails folders. Here’s what you need to do to add them to the Safe Senders list.
-
- Go to your Junk Email folder.
- Right click over the email.
- Click Junk and then click Not Junk.

- Make sure that the “Always trust….” checkbox is ticked.
- Click OK.
The senders email address will be added to the Safe Senders list and the email will be moved to your Inbox too.
Using The Jet Compact Utility To Compress A Database
Posted onWe offer:
- Monthly Service Contracts to Manage your POS so you can manage your business.
- Protect your POS data with Remote Backup Services – Only $20 a month!
- Need Help? We havehourly remote access and phone support for your critical issues – keep your business working!
Call Us Today 718-921-6159
URGENT DATA LOSS CAN RESULT – FOLLOW THESE INSTRUCTIONS
- BACKUP YOUR DATA BEFORE YOU BEGIN!
- TURN OF ALDELO POS BEFORE YOUR BEGIN
- IF POSSIBLE TURN OFF ALL COMPUTERS EXCEPT SERVER BEFORE YOUR BEGIN
- DID WE MENTION TO BACKUP YOUR DATA BEFORE YOU BEGIN?
- IF YOU ARE UNSURE OF ANYTHING FOR ANY REASON CALL 718-921-6159 – our low cost service rates wont damage your business as having this procedure fail.
After running your restaurant with Aldelo® For Restaurants for a period of time, the database can become very large. This in turn can slow down the software. Reducing the size of the database by running the jet compact utility can help keep the software running at its peak of performance. The Aldelo® Jet Compact Utility creates a copy of the database at a reduced size. This new database is saved in the same folder as your active database.
Note: THIS PROCEDURE SHOULD BE DONE ON THE POS TERMINAL DESIGNATED AS THE SERVER. Be sure to create a backup of your live database before attempting to use the Aldelo® Database Cleaner utility. In Aldelo® For Restaurants, navigate to the Back Office and click on “Backup Database” under Common Tasks.
Open the Start Menu and Click Run (or press the Windows Key + R on the keyboard)
Browse to the following path: C:\Program Files\Aldelo\Aldelo For Restaurants\Aldelo For Restaurants POS\
Note: on 64 bit systems the path is: C:\Program Files (x86)\Aldelo\Aldelo For Restaurants\Aldelo For Restaurants POS\
Open the Jet Compact Utility: JETCOMP.exe
In the Jet Compact Utility, specify the source database. In most instances, databases are stored in c:\RESDATA.
Next, select the destination for the new (compacted) database. Ensure the new database is given a new name. You do not want to overwrite the existing one!
Database Locale: Leave “None – Use Current language” selected
Under Additional Compact Options, leave “Destination is 4.x database format” selected.
Click the compact button. Depending on the size of the database, this process can take some time.
Once the compact is completed, open C:\Resdata
- Take note of the current database name, which we refer to as [DatabaseName] in the next steps.
- Rename the original database to Old-[DatabaseName]
- Rename the compacted database to [DatabaseName]
Open Aldelo. Aldelo should now open up using the new compacted database.
Using Aldelo Database Cleaner To Archive Old Sales (Reduce Database Size)
Posted onWe Offer:
- Monthly Service Contracts to Manage your POS so you can manage your business.
- Protect your POS data with Remote Backup Services – Only $20 a month!
- Need Help? We Havehourly remote access and phone support for your critical issues – keep your business working!
Call Us Today 718-921-6159
The Aldelo® Database Cleaner reduces the size of the active database in Aldelo® For Restaurants and archives the old sales information for tax purposes. Sales and void information are removed from the database while leaving other data, such as customer information, inventory information, employee information, etc., intact. It is very simple to use.
Warning! Do not use the Aldelo® Database Cleaner utility if there are any outstanding gift certificates or in house charges remaining that were issued prior to your selected date. If you do, these gift certificates and in house charges will be removed from the database along with your sales and void information. Once this information has been removed, it cannot be recovered. Always backup your database before using the Aldelo® Database Cleaner utility. Aldelo Systems Inc. shall not be responsible for any damages whatsoever, monetary or otherwise, resulting from the use of this software.
After running your restaurant with Aldelo® For Restaurants for a period of time, the database can become very large. This in turn can slow down the software. Reducing the size of the database by removing and archiving old sales information can help keep the software running at its peak of performance. The Aldelo® Database Cleaner utility allows the user to select a date prior to which all sales information will be removed from the active database and placed in an archive file. This archive file has a .archive file extension and is saved in the same folder as your active database.
Running the Utility
Note: Be sure to create a backup of your live database before attempting to use the Aldelo® Database Cleaner utility. In Aldelo® For Restaurants, navigate to the Back Office and click on “Backup Database” under Common Tasks.
First, open Aldelo® For Restaurants and navigate to the Back Office. In the System Information group box, make note of the path to the active database file listed under Data Source. You will need this information shortly.
Next, before you can run the Aldelo® Database Cleaner, you must shut down Aldelo® For Restaurants on all workstations, including the server computer. Then, from your desktop, navigate to Start > All Programs > Aldelo For Restaurants > Tools and click on “Database Cleaner” to display the main screen of the utility.
Click on the “Browse” button to display the Database File Selection window. In this window, navigate to the location of your existing live database file. The default path is C:\ Documents and Settings \ All Users \ Application Data \ Aldelo \ Aldelo For Restaurants \ Databases \ Live. If your file is not found here, navigate to the file along the path that was listed in the Back Office of Aldelo® For Restaurants under Data Source. Select your file and click “Open”.
The main screen re-appears with the path to your database displayed in the field at the top. In the lower field, enter the date before which you wish to delete the sales information from your database. The date must be in numerical format with a hyphen or slash separator, such as “01-01-2008” or “1/1/08.” After entering the date, press the “Enter” button on your keyboard. If the date was entered incorrectly, the text you entered in the date field is deleted automatically. Re-enter the date in the correct format. If the date was entered in the correct format, the “Start Cleaning” button is revealed and enabled. Click the “Start Cleaning” button to complete the process.
The Operation Complete message displays when the database cleaning is finished. Click the “OK” button to have the utility attempt to compact the database.
A message confirms that the compact procedure completed successfully (if the compaction fails, be sure to manually compact your database in Aldelo® For Restaurants). Click the “OK” button.
Your database has been successfully cleaned, archived, and compacted!