Aldelo Error: Path Not Ready

Posted on

The selected Aldelo database is not accessible.  The most likely reason is that the database is on another computer on the network, and the client computer cannot access that file.
Make sure all network cables are securely connected

  1. Reboot station
  2. Temporarily disable firewalls and retry
  3. Make sure the database file and its containing folder on the server are shared with read/write permission for Everyone.
  4. Make sure both computers are on the same network.  You should be able to ping the server from the client and also browse to the folder containing the database in Windows.If the database is accessible in Windows file explorer, but the Path Not Ready error still appears, we’ll need to force Aldelo to let us choose another database.


If the database is accessible in Windows file explorer, but the Path Not Ready error still appears, we’ll need to force Aldelo to let us choose another database.

  1. Log into Windows as Maintenance or another administrator.
  2. Right-click on the Aldelo for Restaurants shortcut icon on the desktop and hit Properties.
  3. At the end of shortcut target, outside the quotations, add a space and the letters “nodb”.  E.g. “C:Program FilesAldeloAldelo For RestaurantsAldelo For Restaurants POSAFR38.exe” nodb
  4. Click OK.  Now when you run Aldelo from that shortcut it will ask you to select a database.
  5. Click “Always connect to this database” and then browse to the database on the server.
  6. Do this in both the Maintenance and Point of Sale Windows user accounts.
  7. After selecting the desired database in each Windows account, make sure to remove the “nodb” from the shortcut’s target so it will not prompt the user to select the database next time they launch Aldelo.


Fixing Aldelo error “No Valid Database” and starting Aldelo with no database attached

Posted on

Fixing the error –“No Valid Database Message Fix”  or to Start Aldelo POS with No Database

By starting Aldelo POS with no database attached, you have the opportunity to bypass any errors on startup and have access to the ADMIN so you can create a new database.

ALWAYS MAKE A BACKUP OF YOUR DATABASE

  1. Add nodb to end of Aldelo shorcut in windows
  2. Right click on the Aldelo shortcut
  3. Scroll down to PROPERTIES and click
  4. In SHORTCUT TAB – scroll to end and BEFORE the Quote add nodb:
  5. Example: “C:\Program Files\aldelo\aldelo.exe nodb”
  6. Click OK
  7. Try to run Aldelo


Outbound Messages Get Stuck In the Outbox

Posted on

Ever tried to send an email and you notice it gets stuck in the outbox in microsoft outlook? When this happens outlook begins sending the message, and fails due to a number of factors, such as large attachment size, spotty internet, or insufficient wireless coverage. Once the message gets stuck, all subsequent outbound emails get stuck and are unable to be sent. The fix for this is quite simple:

  1. Log into Webmail (Click here for instructions on how to access webmail)
  2. Delete the message from your outbox (Click here for instructions on how to delete a message in webmail)
  3. Switch back to outlook, and the remaining messages should begin sending out as usual

Options Tab & Calendar Views In Webmail

Posted on

Using the Options Tab and Changing Calendar Views:

Set Automatic Replies (Out Of Office Message)

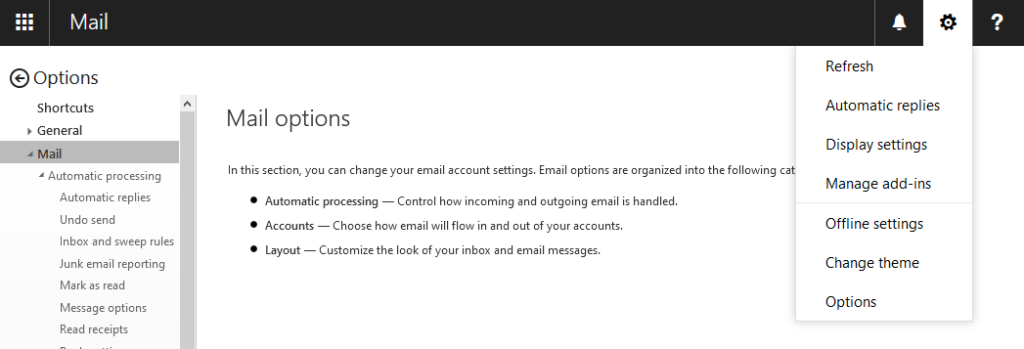
  1. In the main navigation click settings and then options

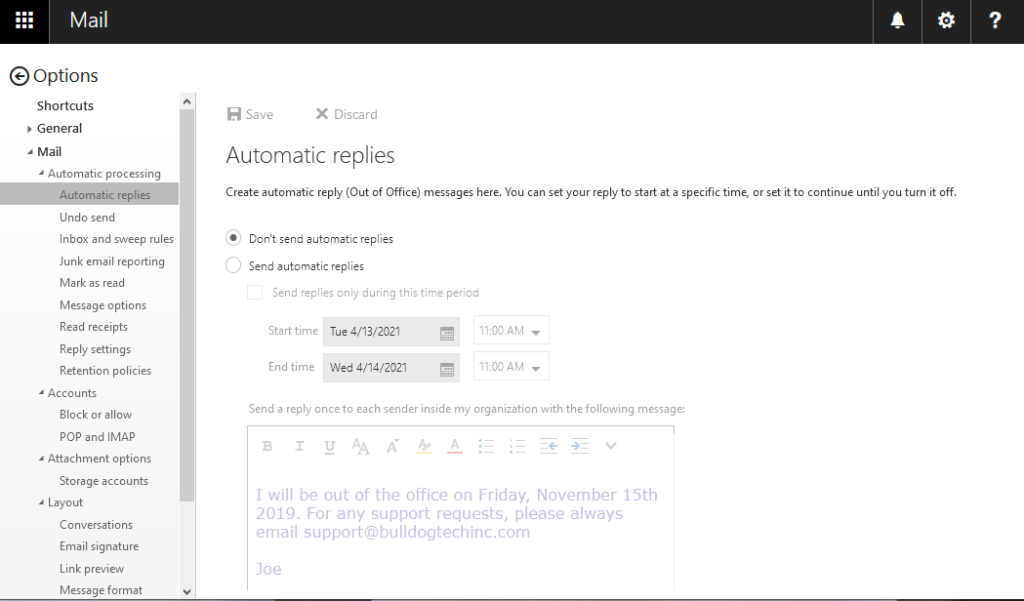
2. Select Automatic Replies
3. Check the box “Send replies only during this time period” and fill in the Start Time and End Time.
4. Fill in the message to be sent out.
5. Scroll down and check the box “Send Automatic Replies messages to senders outside my organization”
6. Re-Enter the auto reply message to be sent out.
7. Click Save

Changing Your Password

  • Click General and then select “My Account”.
  • Click “Change your password”
  • Enter your old password followed by your new desired password. Enter it twice to confirm and then click save.

POP3 Setup for All Versions of Microsoft Outlook

Posted on

Your desktop installation of Outlook can be configured to read your messages using POP3. We support all of the major releases of Microsoft Outlook, which includes Outlook 2003 through Outlook 2013.

In order to create a POP3 connection in Microsoft Outlook, you will need the following pieces of information:

Account Information – This information is provided to you when your E-Mail account is created. If you are unsure of your credentials, we can assist you with resetting your information.

Email Address: YourEmail@YourDomainName.com
Username: YourUsername
Password: YourPassword

Server Information
Incoming Server: pop3.vcsny.com
Incoming Port: 995 (SSL)
Outgoing Server: smtp.vcsny.com
Outgoing Port: 587 (Auto)

Setting up outlook 2010/2016

  1. Select Tools, then Email Accounts
  2. Open Microsoft Outlook
  3. Select Add a new e-mail account, and then click Next
  4. Select E-Mail Account and click next
  5. Select Manually configure server settings or additional server types and then click next
  6. Select Internet E-Mail and then click next
  7. Enter Your Name as you would like it displayed
  8. Enter your Email address (see above)
  9. Enter the incoming server address (as shown above) into the Incoming Mail (POP3) server field
  10. Enter the outgoing server address (as shown above) in the Outgoing Mail (SMTP) field
  11. Enter your username and password (as shown above) in the fields provided under Logon Information
  12. Check the box Remember Password
  13. Click the box More Account Settings
  14. It is not necessary to change the name of the mail account.
  15. Enter your Email Address in the field Reply Email (as shown above)
  16. Click the tab at the top labeled Outgoing Server
  17. Check the box My Outgoing server (SMTP) Requires Authentication, and select Use Same Settings as my Incoming Mail Server
  18. Click the tab labeled Advanced at the top.
  19. Check the box that says This server requires an encrypted connection (SSL) under Incoming server (POP3). Also ensure sure port is 995
  20. Change the port for the outgoing SMTP server to 587
  21. Click Ok to return you to the previous screen
  22. Click Next to end the wizard
  23. Click Finish to close the wizard
  24. Click the Send Receive button in Microsoft outlook

You may see a screen prompting you to enter your username and password. This only needs to be done the first time outlook is set up. Re-enter your username and password, then click Ok.