CNET editor Dong Ngo explains how SSDs work and offers a few useful tips on how to make them last a long, long time.
BY
DONG NGO
APRIL 15, 2017 7:02 AM PDT
Editors’ note: This is a regularly updated article. Read Article at CNET
Traditional hard drives will be here for long time thanks to their large storage space and affordability. However, there is no question that solid-state drives (SSDs) will be the future of storage. Most new computers now come with an SSD as the main storage device. If you have an older (or a new budget-class) machine that still runs on a regular hard drive, it’s definitely time to upgrade. (Here’s some instructions on how to upgrade on a PC and a Mac.) The speed gains you’ll experience from upgrading to an SSD will be by far the biggest performance improvement your computer ever has.
But is it all unicorns and lollipops with SSDs? Not quite. SSDs still fall short in a few places compared to normal hard drives, in particular regarding their write endurance. This means you can only write a finite amount of data to an SSD before you can’t write anymore. In this post, I’ll talk about this shortcoming and how to mitigate it. Most of my suggestions will be focused on Windows PCs.
Writing on a hard drives
The platter is the main component of a traditional hard drive. It’s usually made of glass or aluminum and is the portion that stores your information. It’s coated with a thin layer of metal that can be either magnetized or demagnetized. And the write process is straightforward: the read/write head of the drive hovers on top of the platter and magnetizes and demagnetizes sectors (tiny parts of the platters) into 1 or 0 values to store information in binary patterns. When you overwrite data (that is, when you write new data to an area that already contains data) the process is the same; the sectors just need to be magnetized or demagnetized differently. In other words, writing to a hard drive is always the same, no matter if the drive currently contains data or not.
Writing on an SSD
Writing is totally different and much more complicated with SSDs. There are three important things to remember.
First, aside from when an SSD is brand new and contains no data, writing to an SSD is the process of erasing existing information from the flash memory cells and then programming new information onto them. No new information can be programmed to a cell unless the old data is first erased. For this reason, the process of writing to an SSD is often referred to as program/erase cycles or P/E cycles.
Second, P/E cycles are finite. Each P/E cycle exhausts the memory cell a little more, and after so many cycles it will be totally worn out and become unusable. In a way, this is similar to writing on a piece of paper using a pencil and an eraser. You can only erase the pigment so many times before the piece of paper becomes worn out or even torn and can’t be written on anymore.
And finally, memory cells are organized in pages (each page contains many cells) and blocks (each block contains many pages.) Here’s the tricky part: you can write a page at a time, but you can erase only a block at a time. Now imagine when you want to save a Word document with the changes that can fit in just one page, the SSD needs to first copy the rest of the used pages of the containing block to another place, erase the entire block, then program (or write) all of those pages and the page with the new information. This is called Write Amplification — meaning generally an SSD needs to write a lot more than the actual amount of data you want to write — which further uses up its P/E cycles.
All these result in a few facts. First, SSDs almost always have different write and read speeds. And second, to write optimally, they all need free space to accommodate Write Amplification. Some SSD features Over Provisioning, which is a dedicated amount of free space, non-accessible by users, used only to facilitate its write operation. Without this feature, an SSD’s write speed will get progressively slower as it gets full.
Wear leveling
Now before you let out a “D’oh!” and return your beloved, recently purchased SSD, be aware that the number of potential P/E cycles for an SSD is exponentially larger than that of a sheet of paper. In addition, modern SSDs have technologies that increase write efficiency and reduce wear on its storage cells. Among these technologies, the most important is the “wear-leveling” algorithms that effectively make sure all the drive’s memory chips are used up, cell by cell, before the first cell can be written to again. This also means that SSDs of larger capacities generally have longer life spans than do smaller ones.
So how long is long? To help users estimate how long an SSD will last, most SSD manufacturers present the drive’s endurance by the amount of data that can be written to the drive. For example, the 750GB Crucial MX300 has an endurance of 220TBW, meaning you can write 220 terabytes of data to the drive before it becomes unreliable. To put this in perspective, if you write 50GB of data per day every day to the drive, it will take you some 12 years to wear it out. Most other SSDs have similar or better endurance ratings. Generally the larger the drive, the higher he endurance.
Most of us actually write just a fraction of 50GB of data — which is about two Blu-ray discs’ worth — on our computer’s host drive on a daily basis, and many days we don’t write anything at all. Note that watching movies, reading PDF files, or viewing photos doesn’t count as writing; that’s reading, which has no effect on an SSD’s life expectancy. Only activities like copying music from another drive, downloading files, editing files, or backing up your phone, and so on require you to write to the drive.
That said, if you use an SSD the way you would a hard drive, chances are it will still last longer than a regular hard drive would. But you can do more.
What you can do
The key to maximize the life span of an SSD is to reduce writing to it. Apart from making an effort to reduce unnecessary copying of files, downloading of data, and so on, you should note that there are a few operating system (OS) settings, as well as common tasks designed for regular hard drives, that shouldn’t be used with SSDs.
Upgrade to the latest operating systems: Modern OSes are designed with built-in support for SSDs. That said, make sure your computer run the latest OS. Currently that’s Windows 10 1703 (Creators Update) and MacOS Sierra.
Benchmarking: Most of us want to find out just how fast our new SSD is by copying files from one place to another or using disk-benchmarking software. While this is fun and the information is useful to know, it does waste the drive’s P/E cycles. Avoid it if you can.
Hibernation: (Not to be confused with sleep mode, which won’t affect SSDs’ life span.) Most operating systems have a hibernation feature. During hibernation, the contents of the system memory (the place where currently running programs and information still being processed reside) are written to the computer’s internal storage device (your hard drive or SSD) before the computer is powered off. When the computer is restarted, the system reloads the saved content back into the system memory, and hence restores the computer to the state it was in before it was turned off. Once the loaded, the saved content is deleted from storage.
As you can imagine, the hibernation process can use gigabytes of storage space over time, which translates to a large amount of writing on the internal storage. More specifically, a computer with 4GB of RAM requires some 4GB of storage space to create a hibernation file. Sometimes a computer goes into hibernation by itself, but you can avoid this by completely turning off the hibernation function. Here’s how:
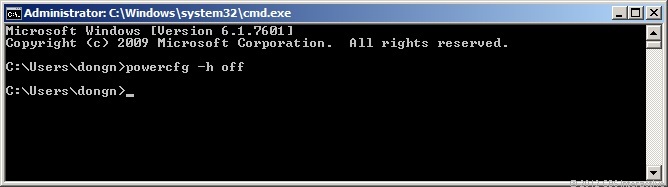
Right click on the Start button (or press Windows + X) to open the WinX menu, then click on Windows Powershell (Admin) and answer “Yes” to the User Account Control security prompt.
When the Powershell prompt window appears, type in powercfg -h off and then press Enter.
That’s it — your computer will never go into hibernation mode again. To turn this feature back on, repeat this process and type powercfg -h on before pressing Enter.
A computer that’s equipped with an SSD generally boots really quickly, so you can always just save your work and turn it off. Avoiding hibernation also helps the system run more smoothly.
AHCI and TRIM commands:
AHCI, which stands for “advanced host controller interface,” allows the operating system to access the storage faster and use some advanced functions. One of these functions is the TRIM command, which allows a supported operating system to actively inform the SSD which blocks of data are no longer in use and can be wiped. This helps the drive work more efficiently, reduce the effect of Write Amplification and ultimately leads to faster performance and a longer lifespan.
Generally, both AHCI and TRIM are enabled by default. You can check and change the former in the computer’s BIOS setting. It varies depending on your computer, but with most systems you can enter the BIOS by tapping the Delete or F2 key as the computer boots up. Here, look for the storage section and change the value of “Configure SATA as” to “AHCI” (if it’s not already AHCI). It’s better to do this before you install the operating system, otherwise you’ll need to install the storage drivers first before changing the value. Note that if you use two SSDs in a RAID configuration, then the RAID value (rather than AHCI) should be selected. Also if your computer doesn’t have option for RAID or AHCI, but only IDE, then it’s too old — time to shop for a new computer.
You can determine if TRIM is working by running elevated Windows Powershell as described above in the hibernation section, then executing this command:
fsutil behavior query DisableDeleteNotify
If the command returns “DisableDeleteNotify = 0”, then TRIM is running. If not, you can turn it on by executing:
fsutil behavior set disabledeletenotify 0
Superfetch: This is a technology, first introduced in Windows Vista, that allows Windows to more efficiently manage system memory and preload frequently accessed data and applications into the memory for faster performance. However, this process requires Superfetch’s cache to be written on the drive and updated regularly, which increases the amount of writing to the drive.
If your computer uses a hard drive, Superfetch is useful. For an SSD, however, it’s not necessary and only wastes the drive’s P/E cycles.
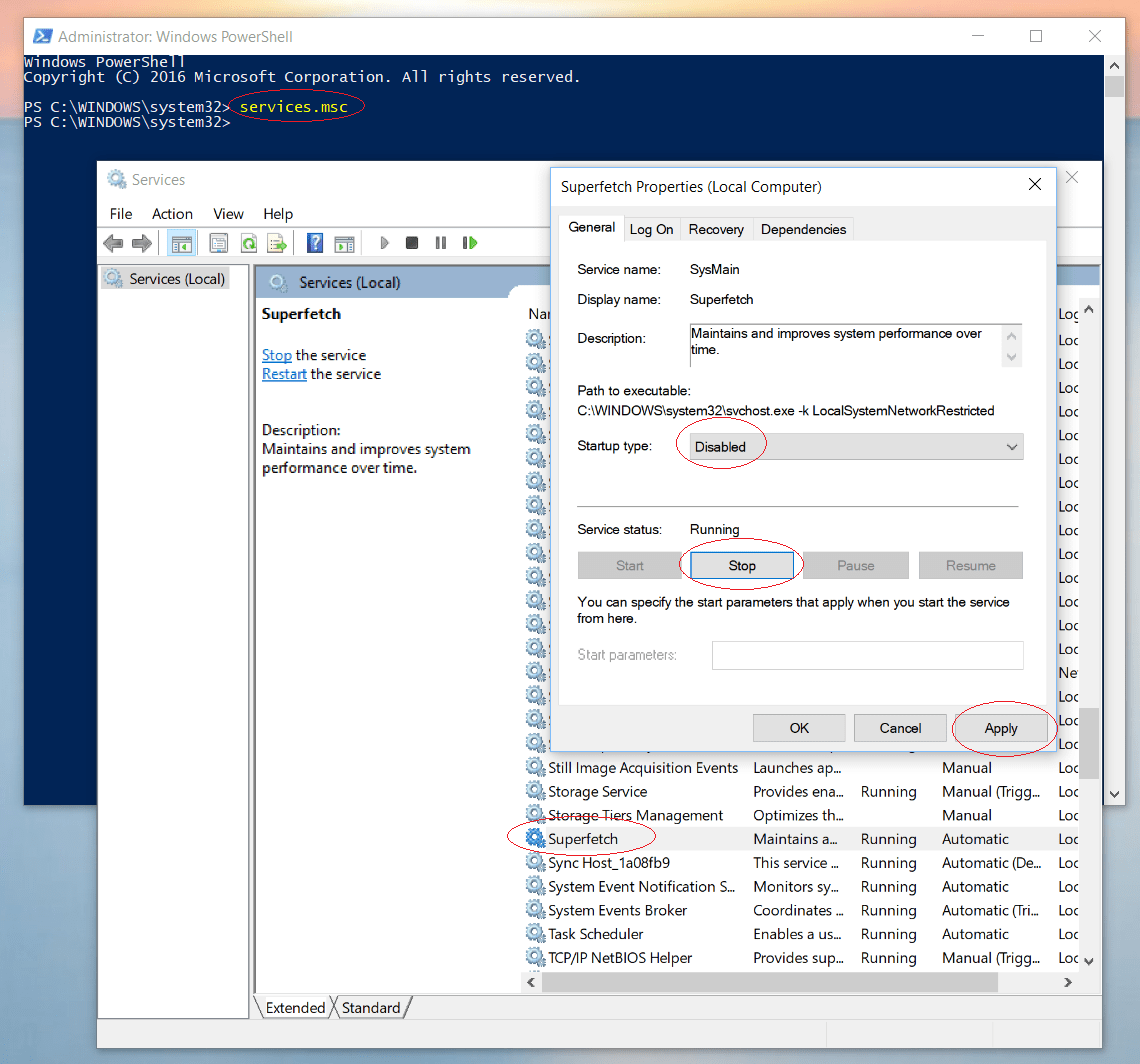
To disable Superfetch, run the Windows Powershell as mentioned above and execute the services.msc command. This will open the Services utility. Next, on the list, look for Superfetch, then double-click it and disable it.
Page File (aka virtual memory): In OSes such as Windows 10, the Page File is like a system memory wannabe. In a nutshell, the Page File is the amount of storage space on an internal storage device that the OS reserves for use when an application requires more physical memory (RAM) than the computer is equipped with.
The Page File’s size tends to change dynamically, resulting in frequent writing to the drive, which, again, is not good for an SSD. So if you use a computer with 8GB of RAM or more, and you generally don’t run lots of concurrent programs, it might be a good idea to turn off Page File completely. However, the best practice is to set it at a fixed size recommended by the system. Or if you’re on a desktop with an SSD as its primary drive and a secondary hard drive, it’s best to move the Page File to the hard drive and disable it on the SSD.
To change the setting of Windows 10’s Page File, follow these steps:
Right-click on Windows’ Start button
Select System (then, if you’re running Windows 10 1703, click on System info)
Click on Advanced System Settings
Choose Advanced tab
Click on the top Settings… button (under the Performance section)
Choose Advanced tab
Click on Change
Uncheck the box that reads “Automatically mange paging file size for all drives”
Check the Custom size radio button
Enter the Initial size and Maximum size with the value of the number following the Recommended: at the bottom of the window
Click on the OK buttons to close the Windows, and choose to Restart the computer.
Move the default location of a frequently written folder to a different drive: This only applies to computers (most likely desktops) with a secondary internal hard drive. In this case it’s a good idea to move the default location of folders that are often written to that drive.
If it’s one of the folders within your profile on a Windows computer — Downloads, Documents, Pictures and so on — you can follow these steps to move it to a new location.
With other folders, you might need to change the default location in the settings/preferences of the software.
Don’t stress
That’s it. After all that, you can rest assured that you’ve done nearly all that can be done to make your SSD work at its most optimal and last as long as possible. Again, note that these are just precautions; if you simply use an SSD the way you do a hard drive, chances are it will still last for a very long time. The latest operating systems all come equipped with SSD-friendly settings that help reduce unnecessary writing. So for most of us, there’s not much to worry about.