Converting Evaluation Versions To Retail Versions of Windows Server 2012

Posted on

This document summarizes key information about evaluation versions of Windows Server® 2012, including where to obtain them, the limits on their use, and how to convert them to full retail versions. It also summarizes the supported upgrade paths from previously licensed retail versions of Windows Server to Windows Server 2012.

Evaluation versions of Windows Server 2012

Fully functional time-limited evaluation versions of Windows Server 2012 are available for the following editions:

  • Windows Server 2012 Standard
  • Windows Server 2012 Datacenter
  • Windows Server® 2012 Essentials

These evaluation versions are 64-bit only and can be installed with the Server Core option or the Server with a GUI option. For more information about these installation options, how to convert between them, and how to use the new Minimal Server Interface and Features on Demand, see http://technet.microsoft.com//library/hh831786.

For all editions, you have 10 days to complete online activation, at which point the evaluation period begins and runs for 180 days. During the evaluation period, a notification on the Desktop displays the days remaining the evaluation period (except in Windows Server 2012 Essentials). You can also run slmgr.vbs /dlv from an elevated command prompt to see the time remaining.

Where to find evaluation versions

You can get evaluation versions by the following methods:

  • Windows Server 2012 Standard; Windows Server 2012 Datacenter: from the TechNet Evaluation Center (http://technet.microsoft.com/evalcenter/hh670538.aspx). These editions are also available as pre-created VHDs for use in virtualized environments.
  • Windows Server 2012 Essentials: from http://go.microsoft.com/fwlink/p/?LinkId=266340

Limits of evaluation versions
All evaluation versions are fully functional during the evaluation period, although booting to Safe mode is not available. The Windows Server 2012 Standard and Windows Server 2012 Datacenter editions come with the activation key pre-installed. After the 180-day evaluation period elapses, the server warns you in various ways depending on the edition:

Windows Server 2012 Standard; Windows Server 2012 Datacenter:

  • The following warning appears on the Desktop: Windows License is expired
  • When you log on to Windows, you are prompted with the following options: Activate now, Ask me later
  • The system shuts down every hour.
  • The only updates that can be installed are security updates.
  • Event ID 100 from source WLMS “The license period for this installation of Windows has expired. The operating system will shut down every hour.” appears in the Application log.

Windows Server 2012 Essentials: you receive warnings on the Desktop and on the dashboard, but the server does not shut down.

Converting evaluation versions of Windows Server 2012 to full retail versions

Most evaluation versions can be converted to full retail versions, but the method varies slightly depending on the edition. Before you attempt to convert the version, verify that your server is actually running an evaluation version. To do this, do either of the following:

  1. From an elevated command prompt, run slmgr.vbs /dlv; evaluation versions will include “EVAL” in the output.
  2. From the Start screen, open Control Panel. Open System and Security, and then System. View Windows activation status in the Windows activation area of the System page. Click View details in Windows activation for more information about your Windows activation status.

If you have already activated Windows, the Desktop shows the time remaining in the evaluation period.

If the server is running a retail version instead of an evaluation version, see the “Upgrading previous licensed versions” section of this document for instructions to upgrade to Windows Server 2012.

For Windows Server 2012 Essentials: You can convert to the full retail version by entering a retail, volume license, or OEM key in the command slmgr.vbs.

If the server is running an evaluation version of Windows Server 2012 Standard or Windows Server 2012 Datacenter, you can convert it to a retail version as follows:

  1. If the server is a domain controller, you cannot convert it to a retail version. In this case, install an additional domain controller on a server that runs a retail version and remove AD DS from the domain controller that runs on the evaluation version. For more information, see http://technet.microsoft.com/library/hh994618.aspx.
  2. Read the license terms.
  3. From an elevated command prompt, determine the current edition name with the command DISM /online /Get-CurrentEdition. Make note of the edition ID, an abbreviated form of the edition name. Then run DISM /online /Set-Edition: /ProductKey:XXXXX-XXXXX-XXXXX-XXXXX-XXXXX /AcceptEula, providing the edition ID and a retail product key. The server will restart twice.

For the evaluation version of Windows Server 2012 Standard, you can also convert to the retail version of Windows Server 2012 Datacenter in one step using this same command and the appropriate product key.

Upgrading previous retail versions of Windows Server to Windows Server 2012

The table below briefly summarizes which already licensed (that is, not evaluation) Windows operating systems can be upgraded to which editions of Windows Server 2012.

Note the following general guidelines for supported paths:

  • In-place upgrades from 32-bit to 64-bit architectures are not supported. All editions of Windows Server 2012 are 64-bit only.
  • In-place upgrades from one language to another are not supported.
  • In-place upgrades from one build type (fre to chk, for example) are not supported.
  • If the server is a domain controller, see http://technet.microsoft.com/library/hh994618.aspx for important information.
  • Upgrades from pre-release versions of Windows Server 2012 (such as the Release Candidate) are not supported. Perform a clean installation to Windows Server 2012.
  • Upgrades that switch from a Server Core installation to the Server with a GUI mode of Windows Server 2012 in one step (and vice versa) are not supported. However, after upgrade is complete, Windows Server 2012 allows you to switch freely between Server Core and Server with a GUI modes. For more information about these installation options, how to convert between them, and how to use the new Minimal Server Interface and Features on Demand, see http://technet.microsoft.com/library/hh831786.
  • If you do not see your current version in the left column, upgrading to this release of Windows Server 2012 is not supported.

If you see more than one edition in the right column, upgrade to either edition from the same starting version is supported.

If you are running: You can upgrade to these editions:
Windows Server 2008 Standard with SP2 or Windows Server 2008 Enterprise with SP2 Windows Server 2012 Standard, Windows Server 2012 Datacenter
Windows Server 2008 Datacenter with SP2 Windows Server 2012 Datacenter
Windows Web Server 2008 Windows Server 2012 Standard
Windows Server 2008 R2 Standard with SP1 or Windows Server 2008 R2 Enterprise with SP1 Windows Server 2012 Standard, Windows Server 2012 Datacenter
Windows Server 2008 R2 Datacenter with SP1 Windows Server 2012 Datacenter
Windows Web Server 2008 R2 Windows Server 2012 Standard

Per-server-role considerations for upgrading

Even in supported upgrade paths from previous retail versions to Windows Server 2012, certain server roles that are already installed might require additional preparation or actions for the role to continue functioning after the upgrade. The following table summarizes these considerations.

Server role Upgrade information
Active Directory
  • Active Directory Domain Services (AD DS): Active Directory domains can be upgraded by upgrading the operating system of existing domain controllers or by replacing existing domain controllers with domain controllers that run Windows Server 2012. For more information, see Deploy Active Directory Domain Services (AD DS) in Your Enterprise (http://go.microsoft.com/fwlink/?LinkId=262195).
  • Active Directory Lightweight Directory Services (AD LDS): For more information, see Upgrading from ADAM to AD LDS (http://go.microsoft.com/fwlink/?LinkId=186351).
Active Directory Federation Services (AD FS) For more information about upgrading AD FS from Windows Server 2008 R2 to Windows Server 2012, see http://technet.microsoft.com/library/jj647765.aspx
Active Directory Rights Management Services (AD RMS) You can perform an in-place upgrade from either Windows Server 2008 or Windows Server 2008 R2 to Windows Server 2012. After completing upgrade of your operating system for any servers running the AD RMS server role, you will need to run the AD RMS Upgrade wizard to upgrade your AD RMS cluster and ensure consistency. Otherwise, your AD RMS cluster might not be in a consistent state. The only other consideration when upgrading that you should be aware of when upgrading from these versions of the Windows Server operating system is that if the Windows Internal Database (WID) was previously selected for use to support your AD RMS database needs, that configuration will block your upgrade to Windows Server 2012 and require you to take additional steps. To unblock your upgrade to Windows Server 2012 you must first uninstall the AD RMS server role and migrate the existing WID instance to a SQL Server instance. For more information, see http://go.microsoft.com/fwlink/?LinkId=229299.
Fax Server See http://technet.microsoft.com/library/jj134193.aspx.
File and Storage Services After you upgrade a Windows Server 2008 R2-based server that has DFS Management installed, you must reinstall the DFS Management Tools on the server. To install the DFS Management Tools, run the following Windows PowerShell cmdlet as an administrator: Install-WindowsFeature RSAT-DFS-Mgmt-Con

You can also use the Add Roles and Features Wizard in Server Manager. On the Features page of the wizard, expand Remote Server Administration Tools, expand Role Administration Tools, expand File Services Tools, and then select the DFS Management Tools check box.

Hyper-V Shut down and save all virtual machines prior to starting upgrade. For additional information, see http://technet.microsoft.com /library/hh831531
Print and Document Services See http://technet.microsoft.com/library/jj134150.
Remote Access Routing and Remote Access Service (RRAS) was a role service in Windows Server operating systems prior to Windows Server 2012 that enabled you to use a computer as an IPv4 or IPv6 router, as an IPv4 network address translation (NAT) router, or as a remote access server that hosted dial-up or virtual private network (VPN) connections from remote clients. Now, that feature has been combined with DirectAccess to make up the Remote Access server role in Windows Server 2012. For information about migration from Windows Server 2008 R2 and other versions prior to Windows Server 2012, see http://technet.microsoft.com/library/hh831423.aspx
Remote Desktop Services Windows Server® 2008 R2 Remote Desktop Services role services cannot be migrated to Windows Server 2012, however an existing Windows Server 2008 R2 RD Session Host server deployment can be integrated into a Windows Server 2012 RDS deployment. The Windows Server 2012 RD Web Access can be configured to point to an existing Windows Server 2008 R2 RD Session Host server farm. Desktops and RemoteApp programs published on the Windows Server® 2008 R2 RD Session Host server farm can be accessed from a Windows Server 2012 RD Web Access server.The Following steps need to be completed in order to add an existing Windows Server® 2008 R2 RD Session Host server farm to a Windows Server 2012 Remote Desktop Services deployment:

  • Populate the TS Web Access Computers Security Group.
  • Configure Windows Server 2008 R2 Session Host servers with the right certificate to sign RDP files.
  • Pointing a Windows Server 2012 RD Web Access server to a Windows Server® 2008 R2 RD Session Host server farm.
Volume Activation Services With Active Directory-based Activation, you do not need an additional host server; your existing domain controllers can support activation clients, with the following limitations:

  • Active Directory-based Activation cannot be configured on read-only domain controllers.
  • Active Directory-based Activation cannot be used with non-Microsoft directory services.
  • AD DS must be at the Windows Server 2012 schema level to store activation objects. Domain controllers running earlier versions of Windows Server can activate clients after their schemas have been updated using the Windows Server 2012 version of Adprep.exe. For more information, see What’s New in Active Directory Domain Services Installation and Removal.
Web Server (IIS) No functionality has been removed or changed. Web applications that work in IIS 7.0 run normally in IIS 8.0.

Converting existing Windows Server 2012 versions

At any time after installing Windows Server 2012, you can run Setup to repair the installation (sometimes called “repair in place”) or, in certain cases, to convert to a different edition.

You can run Setup to perform a “repair in place” on any edition of Windows Server 2012; the result will be the same edition you started with.
For Windows Server 2012 Standard, you can convert the system to Windows Server 2012 Datacenter as follows: From an elevated command prompt, determine the current edition name with the command DISM /online /Get-CurrentEdition. Make note of the edition ID, an abbreviated form of the edition name. Then run DISM /online /Set-Edition: /ProductKey:XXXXX-XXXXX-XXXXX-XXXXX-XXXXX /AcceptEula, providing the edition ID and a retail product key. The server will restart twice.

For Windows Server 2012 Essentials, you can run Setup and convert it to Windows Server 2012 Standard by providing the appropriate retail license key.

How to Cancel or Delete a Stuck Print Job in Windows

Posted on

How to Cancel or Delete a Stuck Print Job in Windows

cpj_top

Sometimes, documents you’re printing get stuck in the printer’s queue, preventing further documents from being printed. Here’s how to fix it when that happens.

Whether you’re using a local or shared network printer, sometimes printing doesn’t go quite right. If you’ve tried troubleshooting obvious printer problems—paper jams, no paper, low ink or toner, or simply restarting the printer—it’s time to turn your attention toward the print queue. Often, simply clearing and restarting the print spooler—the software that prepares and manages printing documents—can fix the problem. If that fails, you may need to cancel one or more documents in your print queue and see if that gets things going again.

This should work in Windows Vista, 7, 8, and 10.

Clear and Restart the Print Spooler

Clearing and restarting the print spooler should be your first step when trying to fix stuck print jobs because it won’t actually cancel any of your currently printing documents. Instead, it restarts things and proceeds as if all those documents had just been sent to the printer for the first time.

To do this, you’ll stop the Print Spooler service, delete the temporary cache Windows uses to spool print jobs, and then start the service again. We’re going to show you two ways to do this. First, we’ll look at how to do it manually, and then we’ll look at how to create a batch script so that you can do it any time you want with just a click.

 Clear and Restart the Print Spooler Manually

To clear and restart the print spooler manually, you’ll first need to stop the Print Spooler service. Click Start, type “services,” and then click the Services app.

In the right-hand pane of the Services window, find and double-click the “Print Spooler” service to open its properties window.

In the properties window, on the “General” tab, click the “Stop” button. You’ll be restarting the service a bit later, so go ahead and leave this properties window open for now.

Fire up File Explorer and browse to the following location—or just copy and paste this text into your File Explorer address bar and hit Enter:

%windir%\System32\spool\PRINTERS

You’ll likely be asked to provide permission to access this folder. Go ahead and accept.

Delete the contents of the entire folder by pressing Ctrl+A and then the Delete key.

cpj_12

Now, return to that open properties window in the Services app and click “Start” to restart the Print Spooler service. Click “OK” to close the properties window and you can also go ahead and exit the Services app.

cpj_13

As soon as you restart the Print Spooler service, all the documents in your queue are immediately respooled and sent to the printer. If all goes well, they should start printing again right away.

Clear and Restart the Print Spooler with a Batch File

 If clearing your print queue by restarting the Print Spooler service is something you think you’ll be doing more than once—or you’d just rather not go through the trouble of using the Services app—you can also create a simple batch file to do the job.

Fire up Notepad or your preferred text editor. Copy and paste the following text as separate lines into the blank document:

net stop spooler
del /Q /F /S "%windir%\System32\spool\PRINTERS\*.*"
net start spooler

Next, you’ll save your document as a .bat file. Open the “File” menu and click the “Save As” command. In the “Save As” window, browse to the location you want to save the file. On the “Save as type” drop-down menu, choose the “All files (*.*)” entry. Name your file whatever you like, but include “.bat” at the end. Click “Save” when you’re done.

You can now double-click that batch file to clear the print spooler whenever you want. Better yet, create a shortcut to the batch file and then place that shortcut where it makes the most sense to you—desktop, Start menu, or taskbar—and you’ll have one-click access to clear and restart the print spooler whenever you want.

Restart or Cancel Some or All of Your Printing Documents

If clearing and restarting the print spooler didn’t do the trick, the next step you’ll want to take is to see if you can identify—and cancel—whatever document is stuck. Sometimes, clearing a single stuck document will get your printer going again and any other print jobs in the queue can finish printing normally. Other times, you might have to cancel all the currently printing documents and then try printing them again.

Click Start, type “devices,” and then click the “Devices and Printers” Control Panel app.

cpj_1

In the Devices and Printers window, right-click the printer you’re having trouble with and then click the “See what’s printing” command to open the print queue.

cpj_2

The print queue window shows the print jobs currently awaiting printing. If a single document is causing the problem and you have more than one document in the queue, it’s usually the earliest document that’s stuck. Click the header for the “Submitted” column so that the documents are arranged in the order they were submitted, with the earliest at the top. Note that in our example, we arranged the columns so they would fit in our screenshot better, so your “Submitted” column may be further to the right.

cpj_3

Right-click the earliest print job and then select “Restart” from the context menu.

cpj_4

If your printer cranks up and starts printing after restarting the document, you’re good to go. Otherwise, you’ll need to try canceling the document. Right-click the document again and select the “Cancel” command.

cpj_5

Click “Yes” to confirm that you want to cancel the document.

cpj_6

If the cancellation was successful, the document should disappear from the print queue and the printer will start printing the next document in line. If the document didn’t get canceled at all—or if the document did get canceled but printing is still not happening—you’ll need to try canceling all the documents in the queue. Click the “Printer” menu and then choose the “Cancel all documents” command.

cpj_7

All the documents in the queue should disappear and you can try printing a new document to see if it works.


If restarting the print spooler and clearing documents from the print queue didn’t fix your printing problem—and your printer was working successfully previously—then you’ll likely need to turn your attention toward things like updating or reinstalling your printer drivers or moving on to whatever diagnostics are provided by the manufacturer of your printer. But hopefully, these steps have helped fix your stuck print job before going that far.

Windows 10 Paging file error on boot up

Posted on

Error:

Windows created a temporary paging file on your computer because of a problem that
occured with your paging file configuration when you started your computer. The total paging
file size for all disk drives may be somewhat larger than the size you specified

If you get errors that Windows cannot create a paging file, you can do the following:

  1. Try repairing the drive by checking fro errors and defraging
  2. Delete the [pagefile.sys] and reboot
  3. Modify the registry to verify the paging file has a location

Deleting Paging File

  1. Log in under a local Administrator account. (Do this after each restart in these instructions as well.)
  2. If it’s not already open, open the virtual memory settings by rich-clicking on Computer, → PropertiesAdvanced System Settings → click the Advanced tab → Under Performance, click Settings, go to Advanced tab, finally under Virtual Memory section click the Change button.
  3. Uncheck the Autmatically manage paging file size for all drives checkbox.
  4. Set a “Custom size” for the paging file on the C drive: 0MB initial, 0MB maximum.
  5. Click OK, close all dialog boxes, and restart your computer.
  6. After logging in again, delete the file C:\pagefile.sys
    1. To do this, you may need to change your folder settings so you can see it first. Open a window of your C: drive and click Organize at the top, then Folder and Search Options
    2. Click the View tab, and make sure Show hidden files, folders and drives is turned on, and that Hide protected system files is not checked.
    3. Click OK and go back to your C: drive, find pagefile.sys and delete it.
  7. Now go back to the virtual memory settings (see step 2 above) and set the paging file for the C: drive to System managed size, and then make sure the Automatically manage paging file size for all drives checkbox is checked.
  8. Click OK, close all dialog boxes, and restart your computer.

Registry Change

HKLM\SYSTEM\ControlSet001\Control\Session Manager\Memory Management/PagingFiles

Resolving HDMI Sound Issues

Posted on

Resolving HDMI Sound Issues

  • Right-click the Volume icon by the time in the lower-right corner.
  • Click Playback Devices.
    The Sound window opens.
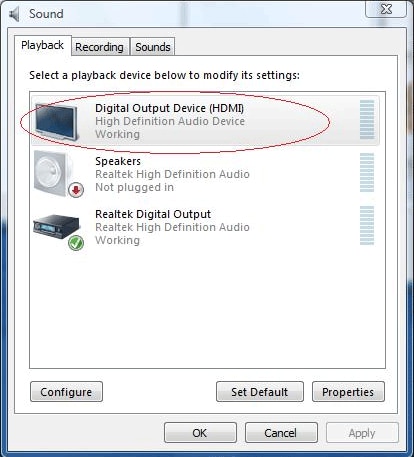
  • On the Playback tab, click the following audio output device that is listed:
    • Digital Output Device (HDMI)
      Figure : Digital Output Device (HDMI) selection

      Image of Digital Output Device (HDMI) selection

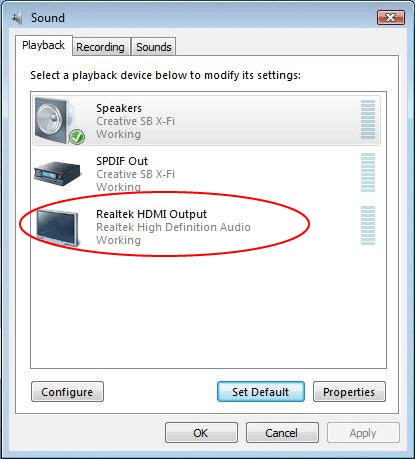
    • Realtek HDMI Output
      Figure : Realtek HDMI Output selection

      Realtek HDMI Output selection

    • NVIDIA HDMI Output
      Figure : NVIDIA HDMI Output selection

      NVIDIA HDMI Output selection

    • ATI HDMI Output
      Figure : ATI HDMI Output selection

      ATI HDMI Output selection

  • Click Set Default.
  • Click Apply.
    • If you used Digital Output Device (HDMI), click OK to close the window. This completes the steps to activate HDMI sound.
    • If you used Realtek HDMI Output, continue with Step 6.
  • Double-click Realtek HDMI Output.
    The Realtek Digital Output Properties window opens.
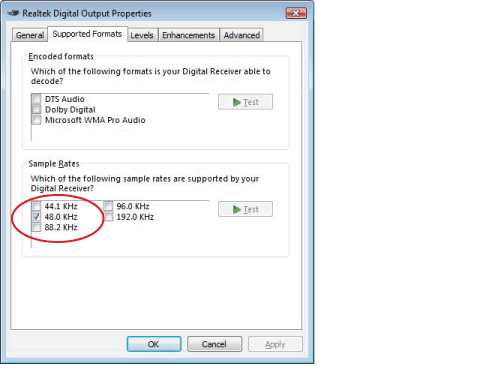
  • Click the Supported Formats tab.
  • Place a check in the 48.0 KHz check box, and make sure that there are no checks in the Dolby Digital check box and all other check boxes.
    Figure : Supported Formats settings in the Realtek Digital Output Properties window

    Supported Formats settings in the Realtek Digital Output Properties window

      note:
    For most TVs to play back audio, the sample rate must be 48.0 KHz.


Nortel/Norstar Auto Attendant and Voice Mail Phone System Programming

Posted on

Nortel/Norstar Auto Attendant and Voice Mail Phone System Programming

Programming must be done from any M7310, T7316, or M7324 model phone set.

On phone Handset Press Feature 983

Id 1020000

Press AA

Press GRTG

Press GRTG

Create or Select Greeting:

1 – Message 1

2 – Message 2

3 – Message 3

4 – Message 4

etc…

Record messages using handset

Press OK

Play or record new message

Press OK

Additional Programming

Programming must be done from any M7310, T7316, or M7324 model phone set.

 To Log Into System Administration:

1. Enter Feature 983
2. The display will show “LOG”, enter your login password

a. If your company extensions are 2 digits long enter “120000”
b. If your company extensions are 3 digits long enter “1020000”
c. If your company extensions are 4 digits long enter “10020000”

  1. Press the softkey under “OK”

    To Create a New Mailbox:

  2. Log into system administration
  3. Select the softkey under “MBOX”
  4. Select the softkey under “ADD”
  5. Enter the mailbox number (extension. you want to add
  6. Mailbox type: Subscriber and then select “OK”
  7. Extension: Usually the same as the mailbox number
  8. Service Class: Enter 1
  9. Name: Enter the name using the dial pad. Enter last name first, press “# #” to enter a comma, and then enter the first name. When spelling the name, press # to move to the next character
  10. Directory: Y (Yes.
  11. Message Waiting: Y (Yes.
  12. Out dial: Pool, enter 1 and then OK
  13. Accept: 1, select OK

    To Delete a Mailbox:

  14. Log into the system administration
  15. Select the softkey under “MBOX”
  16. Select the softkey under “DEL”
  17. Enter the mailbox number (extension. you want to delete
  18. Select the softkey under “Delete”

    To Reset a Mailbox Password:

  19. Log into system administration
  20. Select the softkey under “MBOX”
  21. Select the softkey under “Chng”
  22. Enter the mailbox number you want to reset the password for
  23. The display shows “Reset Password”
  24. Select the softkey under “RESET”
  25. Press the release key
    *The new password will be “0000”, the system will ask the user to change this the first time they log into their mailbox using this password.

    To Change the Name on a Mailbox:

  26. Log into system administration
  27. Select the softkey under “MBOX”
  28. Select the softkey under “Chng”
  29. Enter the mailbox number (extension. you want to change the name on
  30. The display shows “Reset Password”
  31. Select the softkey under “Next”, keep hitting “Next” until the display shows the name
  32. Select the softkey under “Chng” to enter a new name
  33. Enter the name using the dial pad. Enter last name first, press “# #” to enter a comma and then enter the first name. When spelling the name, press “#” to move to the next character
  34. Select the softkey under “Next” to save the change
  35. Hit the release button

    To Change the “Recorded” Name for the Company Directory:

  36. Have the Voicemail User log into their mailbox, after putting in their password, press the button under “Admin” (or press the number 8 key., and then press the number 1 key.
  37. You will hear the old recorded name and then the system will “beep”, prompting you to record a new name (name only here, not greeting..
  38. Press “Ok” in the window when you are done recording and then “Ok” again to accept the recording