Create & Manage User Accounts Using Utility Netplwiz

Posted on

This article explains that how to manage User Accounts using utility “Netplwiz”. Netplwiz facilitates Administrator to add, remove users and groups and gives wonderful alternate to local users and groups MMC tool. Here people will get to know that how it manages Windows 8 / Windows 8.1 User Accounts and what are the functionalities and features of Advance User Accounts Control Panel(Netplwiz).

Functionalities of Advance User Accounts Control Panel(Netplwiz)

1. Create/Add User Account

There are many ways in Windows 8 / Windows 8.1 operating system to create user account among them Advance User Accounts Control Panel(Netplwiz) utility is also there . To create an account the user to be an Administrator or part of Administrator group.

First Step:

Open Advance User Accounts Control Panel using key Windows + R from the keyboard or click on Start –> Run program and type “Netplwiz” and click “OK”.

Second Step:

After opening the User Accounts wizard, click on the “Add” button to create a new user account. As soon as user click on Add button gets “Add a User” Wizard. In the “Add a User” Wizard as an Administrator, fill all columns and click on “Next”.

For example: Give the User name: SomyaSystem, Password, Reenter password, and Password hint: Somya Password and click on “Next”.

Third Step:

After clicking on “Next” button, one more wizard opens that will be the confirmation wizard from Administrator. This wizard also facilitates the Administrator to decide that the User Account is created for Child \ Kids or not, if the account is created for Child \Kids, Windows 8 / Windows 8.1 offers an option to turn on Family Safety for that account, as shown below.

Fourth Step:

Click “Finish” to create a User Account.

2. Remove User Account

Using “Netplwiz”, user cannot only create a User Account, they can remove the account too, only user should have Administrator privileges to do that.

First Step:

Follow same steps to open User Accounts Control Panel using key Windows + R from the keyboard or click on Start –> Run program and type “Netplwiz”.

Second Step:

After opening User Accounts wizard, select the account user wants to remove from Windows 8 and click on Remove button. For example; let’s remove the above created account SomyaSystem. To remove this account, first select the “SomyaSystem” account, and then click on Remove button, it will show the message given below in the picture to remove the selected account. Read the message and choose “Yes” or “No”. Click on “Yes” option to remove the user from Windows 8 workstation.


3. Properties Option

Properties option facilitates Administrator to change the User accounts General Information and manage Local Group using Group Member option. Using Group Member option Administrators can change the User Account type – Standard User, Administrator, or Other.

Follow steps given below to manage the User Group Membership, only user should have Administrative rights to do that.

First Step:

Open Advance User Accounts Control Panel. From the User Accounts wizard, choose a User account and click on Properties button. For example; choose the above created account “SomyaSystem” and click on Properties option.


Second Step:

In Properties option – General tab, Administrator can change the User Name, Full Name and Description of a specific User Account.

In Properties option – Group Membership tab, Administrator gets three options to change the User account – Standard, Administrator or Other as shown in the picture below.
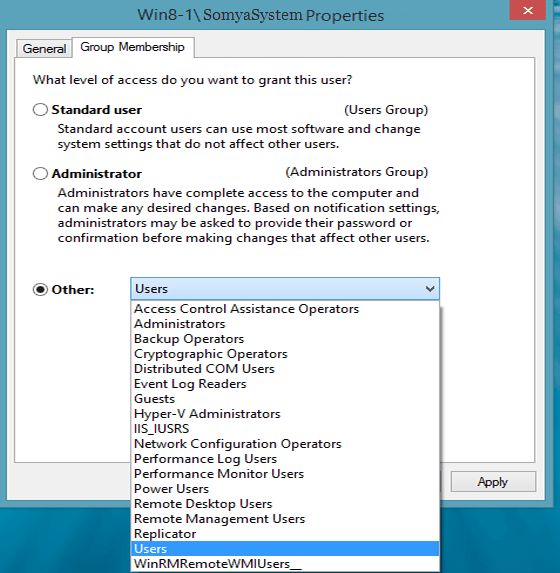
Third Step:

After choosing preferred Group for which User account will be part of, click Apply and OK to complete the process.

4. Reset Password

User who has Administrative rights or the part of Administrator group having rights to reset the password of the Local User accounts as explained in the below steps.

First Step:

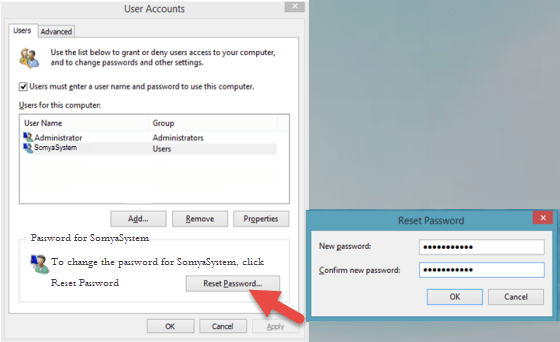
Open Advance User Accounts Control Panel, after opening User Accounts wizard, select the User Account and click on “Reset Password” to change the password.

Second Step:

On the Reset Password wizard, enter the password and click on “OK”.

Mount a Windows Share on a MAC OS X and Have it Reconnect at Login

Posted on

Something Mac users often need to do is be able to access files stored on Windows shares. Here’s a good way to mount those share, and keep them mounting at login.

Mounting the Windows Share

When you are in Finder you can click Go and Connect to Server or you can type Command + K to get to the same menu.

In Server Address you will need to put the location of you Windows share with this format smb://server/share where server is the name or IP address of your Windows machine and share is going to be the folder or drive you want to mount.

If your Windows share requires authentication it will ask you for that info here.

Now if you have Connected Servers showing on your desktop, it will show up on your desktop an in Finder.

Making the Share Mount at Login

To keep the share showing up when you have to log out seems pretty difficult. The internet is littered with ways to write scripts to allow you to do this. But OS X makes it pretty simple if you are just needing to add the share to your machine.

You will need to be in System Preferences for this, which you can get to by clicking on the Apple Menu and then going to System Preferences.

Then you will go to Accounts.

Once in Accounts, you will need go to the Login Items tab. Then you will just drag the share from your desktop or Finder window into the Login Items list.

If your share requires authentication, it may be possible to add the username and password into your keychain with the check box in the authentication window. Some shares will not work with the keychain though.

This is pretty nice if you are working a lot between OS X and Windows, and need to move files between the two.

How to Silence The Buttons (keypad buttons) on S300 Pin Pads

Posted on

We Offer:

Monthly Service Contracts to Manage your POS so you can manage your business.
Protect your POS data with Remote Backup Services – Only $20 a month!
Need Help? We Havehourly remote access and phone support for your critical issues – keep your business working!

Call Us Today 718-921-6159

Call Us Today 718-921-6159

A) Func key + 1: Enter password

B) Press #3

c) Press #1

D) Press #1

E) Press #1

Resolving Aldelo DRM Errors

Posted on

We Offer:

  • Monthly Service Contracts to Manage your POS so you can manage your business.
  • Protect your POS data with Remote Backup Services – Only $20 a month!
  • Need Help? We Havehourly remote access and phone support for your critical issues – keep your business working!

Call Us Today 718-921-6159


The Aldelo DRM Error issue might be caused by a large number of reasons, but the number one cause for an Aldelo error such as “process drm payload failed” or “restart drm service” is all connected to ADRM.EndPoint.Service.exe

ADRM.EndPoint.Service.exe runs itself as a service named ‘Aldelo DRM Services’ (Aldelo DRM Services).

Here are the list of files installed by Aldelo EPS:

Aldelo.AIS.Config.exe – Aldelo.IntegrationServices.Config (Aldelo.IntegrationServices Configuration Utility)
Aldelo.AIS.Service.exe – Aldelo.IntegrationServices
ADRM.EndPoint.Service.exe – ADRM.EndPoint.Service
AKDS.Service.LC.exe – Aldelo KDS Service
ADRM.Client.exe – ADRM.Client (Aldelo DRM Client)
AKDS.Client.LC.exe – AKDS.Client (Aldelo KDS Client)
APFX.Config.exe – APFX.Config
APFX.Server.exe – APFX.Server

Resolution:
To solve the Aldelo DRM Error issue effectively and efficiently, contact Shoreline Technical Services right now at: 714-581-8000

DEPLOY ALDELO EPS
Start the “Aldelo Integration Services” Client Application
1. Click “End Points” Tab and select “Renew Keys” for the DRM entry

2. Click “Home” Tab and Select “Yes” to Renew the AIS Encryption Key

3. Once “Home” Tab is visible, click “Elevate Security” button
4. Once AIS Client application auto restarts, click “Install Service”
5. If the AIS Win Service was previously installed, then click the “Run Service” button instead
Start the “Aldelo DRM” Client Application
1. Click the “Manage Services” button, you may be prompted to
elevate security, if so, answer “Yes”.
2. Once Aldelo DRM client restarts, click “Manage Services” button again to view the Windows Service management screen
3. Click the “Add Http Reservation” button to reserve the http namespace. This is important in order for the DRM service to
operate properly. (Follow the default prompts that appears)
4. Now click the “Install Service” or “Start Service” to enable the
Windows service into running state
5. Now you may exit the Aldelo DRM Client unless you are ready to
activate one or more serial numbers

DRM LICENSING ACTIONS
Activate License
1. Click “Activate License” button within Aldelo DRM Client

2. Enter the Valid and Registered Serial Number
3. Click Next (This May Take a Minute)
4. Confirm The Information and Next / Next
5. Click Finish To Perform Activation
Note: You May Have Multiple Activations of Different Serial Numbers for Different Products, But Same Serial Number Cannot Be
Activated Twice On The Same Compute.

Renew License
1. Select An Existing Activation From The List and Click The Renew License Button

De-Activate License
1. Select An Existing Activation From The List and Then Click The De-
Activate License Button

How To Activate Receipt Printing

Posted on

We Offer:

  • Monthly Service Contracts to Manage your POS so you can manage your business.
  • Protect your POS data with Remote Backup Services – Only $20 a month!
  • Need Help? We Havehourly remote access and phone support for your critical issues – keep your business working!

Call Us Today 718-921-6159


Take out –> Counter –> Delivery
A) Back Office

B) Store Settings
C) Print Tab

D) Customer Receipt Tab

E) Select “Auto Print Receipt When Finish”