Differential, Incremental, and Full Backup in Onguard Remote Backup

Posted on

Onguard Remote Backup uses delta-block differential methods to perform backups.

  1. At backup time the client’s selections are processed and the file system modify time stamp and file size for each file is compared with the corresponding values from the last backup.
  2. For files whose size or modify date has changed (and for all SQL Server and Hyper-V .VHD files selected, whether or not their date or size has changed), the file is
    (a) compressed
    (b) encrypted using AES-256 block encryption and
    (c) broken up into 1MB blocks.
  3. Any blocks in step 2, which have not already been backed up, are backed up.In this way, only changed blocks need to be transferred to the backup server and only one copy of each block needs to be kept (thus the blocks are de-duplicated).  And in this way all backups are actually differential backups.

    Care is taken to preserve the history of files and blocks which are backed up and retained.  This meta-data is stored in small databases which are backed up with each of your backups and 30 days worth of versions of these databases are retained in each local and remote backup store.  You can find these files in your local, auxiliary, or remote backup vaults in the meta subfolder (where the actual blocks are stored in the vault subfolder).  In fact your INI and SEL files, as well as your encrypted key file, is also backed up in a similar manner, to help protect your backups from malware such as CryptoLocker and other infections.

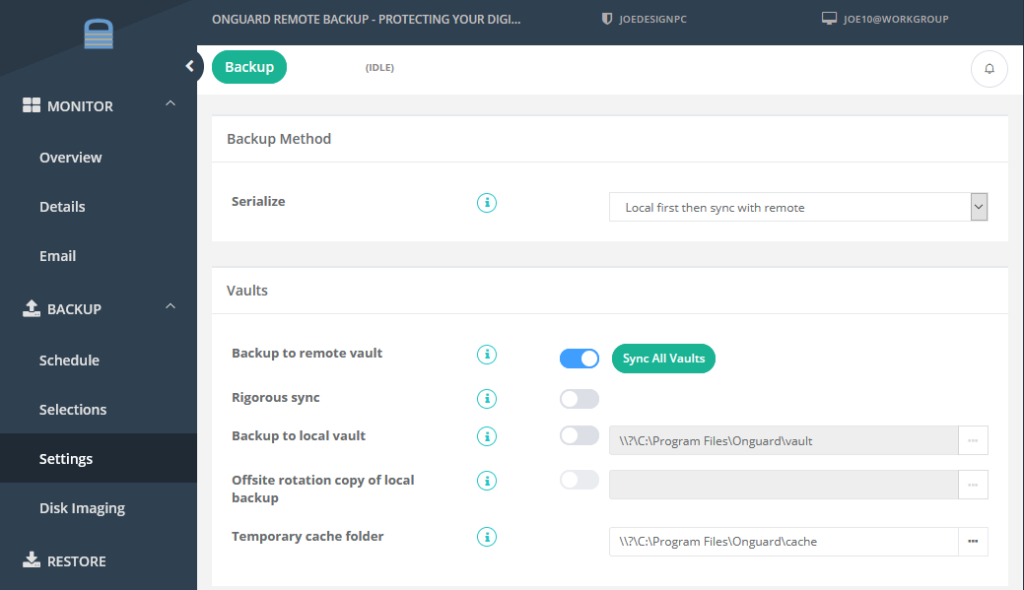
    The Backup->Settings tab provides the means to synchronize all blocks between your backup vault(s) using the “Synchronize all backup vaults…” button.  This process is performed automatically at the end of each backup anyways.

  1. In addition, when the Onguard Remote Backup GUI is launched in expert mode, an additional button appears on the bottom of the Backup->Schedule tab which allows you to force a Full backup, thereby backing up every file and block as if the client were just installed and performing its first backup.  This option is provided if you suspect that all of our backup vault(s), both remote and local, have been corrupted.

What you need to know about DocuChest

Posted on

DocuChest brings all of your photos, documents, even music anywhere you are. Any file saved to your DocuChest will automatically be accessible from any computer, iPhone, iPad, android phone, Mac and even Linux systems. If your computer has a meltdown, your stuff is always safe in DocuChest. Never lose another file again. Never email yourself a file again – take your office with you  – update and upload files to your DocuChest and they will be automatically synced to your pc.

The DocuChest client easily syncs your documents, music & photos – nearly anything that you would need access to. You can flip through all your photos or review that spreadsheet even while on the road. DocuChest lets you work from any mobile device or pc with the confidence that you’ll always have everything you need. DocuChest allows you to send links of specific files to your colleagues making DocuChest perfect for team projects and remote collaboration. Send only the files you want to share.

See all the features here and sign up today for your FREE account. Larger file storage and teams can sign up for our premium accounts.

[su_tabs]

[su_tab title=”Instruction Manual in HTML”]

How to use DocuChest

Logging In

You can connect to DocuChest with your web browser by following the steps listed below. When you enter the URL, you will receive a page that is similar to the one depicted:

  1. Open your web browser, and go to http://www.docuchest.com
  2. Enter your username and password into the area provided.
  3. Click Log In to continue.


Overview

The DocuChest main interface with essential web interface elements numbered:


The web interface comprises of the following items:

  1. Navigation bar: Allows navigation between different parts of DocuChest.
  2. Application view: This is where your content will appear.
  3. Upload/New button: This allows you to create new files or upload existing ones from your device. Note that you can also drop files from Explorer or Finder onto the DocuChest file view and they will get uploaded to DocuChest.
  4. Search/Logout: Search allows you to look for files and directories.
  5. Settings: This button provides access to the settings menu, where you can change your personal settings, such as the interface language or your password. You can also retrieve the WebDAV URL and show your quota.

Modifying your profile

  1. Select the arrow next to your username to display the profile menu
  2. Select Personal to modify your profile.


  1. Password: you can change your password. Enter your current password and your new desired password and click the change password button.
  2. Display Name: Enter a new display name and then click the Change Display Name Button.
  3. Email: enter your preferred email address to be used for password recovery.
  4. Language: Select your preferred language.
  5. WebDAV: Copy and paste this link to access your remote storage through windows explorer.
  6. Media: Copy and paste this link to stream music from your music library.


Uploading Music

  1. Select Files from the left menu.
  2. Click the upload button. Note that the maximum file size per upload is 800 MB


  1. The file upload window will appear. Browse to the location of your music file.
  2. Select the desired file and then click open.


  1. Once uploaded, you can then select the music library on the left navigation pane. Inside the music library you have the ability to stream your music right from DocuChest!

Creating a NEW text file

  1. Select Files from the left menu.
  2. Click New


  1. Select Text File.
  2. Enter a new file name.


Creating a NEW folder

  1. Select Files from the left menu.
  2. Click New


  1. Select Folder.
  2. Enter a new folder name


Managing your contacts

The contacts area of DocuChest allows you to create and manage a contacts list. You can also add additional address books in order to keep your contacts organized.

Adding contacts: There are two ways in which you can add contacts

  1. Add them manually
  2. Import a VCF file

Importing

  1. On the left menu, select contacts.
  2. In the contacts app, select the import button.
  3. Click the select files to import button
  4. Locate the folder containing your VCF files.
  5. Click open.


Create Contacts Manually

  1. On the left menu, select contacts.
  2. In the contacts app, select the add contact button.
  3. Add all your information about the contact: the name, the address, the e-mail, the telephone etc…


Managing your calendar

If you use the calendar the first time, there will be already a calendar called “Default calendar”. You can manage your calendars with a click on the “Calendar” button in the top right corner. In the dialog, which will appear, you can add, edit, export, enable, disable and delete your calendars.


Adding an appointment


Uploading Pictures

  1. Select Files from the left menu.
  2. Click the upload button. Note that the maximum file size per upload is 800 MB.


  1. The file upload window will appear. Browse to the location of your music file.
  2. Select the desired file and then click open.


  1. Once the upload completes, you can view your images from within the pictures library. Click pictures on the left navigation to view the pictures library.


Back to Top

[/su_tab]

[su_tab title=”Video Instructions”]

 How to install DocuChest client on…

Windows

http://www.youtube.com/watch?v=6AB6KmeFnDs&feature=youtu.be

 OS X

http://www.youtube.com/watch?v=3hYaEmYcnOY

iPhone

http://www.youtube.com/watch?v=pwf99-l_050&feature=youtu.be

Synchronize Local folders from a Windows PC

http://www.youtube.com/watch?v=PiX8rlzIE8c&feature=youtu.be

File Features Explored

http://www.youtube.com/watch?v=zYLX6v0FEII&feature=youtu.be

[/su_tab]

[/su_tabs]

For our users: How to protect yourself against SPAM

Posted on

Bulldog Tech’s Spam control panel puts you in control of your mail. Block spammers, allow trusted emails to be delivered, protect against mail viruses and unwanted messages. Manage your inbox efficiently, effectively and safely.

[su_tabs]
[su_tab title=”Instruction Manual in HTML”]

Managing Your Spam Control Panel

  1. Logging into Our Spam Firewall
  2. Resetting Your Password
  3. Viewing the Quarantine Inbox
  4. Changing your settings
  5. Whitelist/Blacklist
  6. Quarantine settings
  7. Spam settings

Logging into Our Spam Firewall

You can now manage your whitelist, blacklist, spam filter settings, and block/unblock messages flagged as spam.

Logging In:

  1. Go to https://barracuda.vcsny.com.
  2. Enter your username, which is your full email address (user@domain.com).
  3. Enter your email password (The same one you use for Outlook & Webmail).


Resetting Your Password

  1. On the login page (https://barracuda.vcsny.com), enter your full email address in the username field.
  2. Leave the password field blank.
  3. Click the Create New Password button at the bottom of the page.
  4. Your new password will be emailed to you. Check your inbox and then click on the link received to log in.


Viewing the Quarantine Inbox

Upon logging in you will be presented with the quarantine inbox, which is where our spam firewall stores any messages it considers to be spam. If you have messages inside the quarantine inbox simply select the ones you wish to retrieve, and then select one of the following:

  • Deliver: Delivers the messages to your inbox.
  • Whitelist: Marks the sender of the message as safe and prevents the firewall from blocking any further messages from the sender.
  • Delete: Permanantly removes  the message from the spam firewall.


Changing Your Settings

Select the preferences button in order to change your individual settings regarding how our system manages your spam filtering. From here you can manage the following:

  • Whitelist / Blacklist
  • Quarantine Settings
  • Spam Settings


Whitelist / Blacklist

Whitelisting allows you to instruct our spam firewall to always allow emails from a specified sender or domain to deliver to your inbox. Black List on the other hand instructs our spam firewall to always block emails from a specified sender or domain.

  • To Whitelist an email address: Enter the full email address under “Allowed Email Addresses and Domains (Whitelist)” and select the Add button.
  • To Blacklist an email address: Enter the full email address under “Blocked Email Addresses and Domains (Blacklist)” and select the Add Button.


Quarantine Settings

On the Quarantine Settings screen, you have the ability to disable or enable the quarantine functionality (all messages deliver to your inbox), set up notifications, and change the default language.

  • Enable Quarantine: Messages deemed to be spam will deliver to your inbox and will not be stored inside our firewall’s quarantine.
  • Quarantine Notification: Should you wish to recieve a report of any messages quarantined, provide your Email Address and select a notification interval. You can receive these notifications Daily, Weekly, or Never.
  • Default Language: Sets the default encoding language. It is recommended that this not be changed.


Spam Settings

On the Spam Settings screen, you have the ability to adjust the sensitivity of the spam checking. Higher scores indicate more strict filtering of messages.

  • Use System Defaults:  Allows you to override our default settings.
  • Tag: Messages with a score of 4 will be marked as spam in the subject line, but will be delivered.
  • Quarantine: messages with a score of  10 will be quarantined and not delivered to your inbox. You will need to log in to the spam firewall in order to retrieve them.
  • Block: Messages with a score of 5 will be blocked.


[/su_tab]

[su_tab title=”Instruction Manual in PDF”]

http://vanguardsys.com/docs/spam_firewall_instructions.pdf

[/su_tab]

[su_tab title=”Video Instructions”]
[/su_tab]

[/su_tabs]