Monitoring Your Backups and Restores using Onguard Backup

Posted on

The Monitor tab presents you with easy to visualize views of your backups and restores.

Overview

The Overview tab provides you with a calendar view of your most recent backups, highlighting which dates backups occurred with color codes indicating if the latest backup on each date was good, had issues, or was interrupted and did not complete.  So, for example, in the screen capture below we see that a backup completed on December 10th with issues, and a good backup completed on December 11th.

The top right portion of the Overview tab indicates the status of the most recent backup completed, if a backup or restore is not currently running, or the status of the currently running operation.  In the screen capture below we see that the most recent completed backup was on December 11th and 1 changed file was backed up.

When a backup or restore is running, the Overview tab shows a dynamic view of what is transpiring, as shown below.

In the above “live” example, the top right panel shows that 64 files are to be backed up of size 383.0MB, and that the backup is 44% complete (this is also shown graphically along the bottom of the window with the green percent complete band) and should be completed in approximately 8 seconds.  The top right panel also shows the upload and download network “bandwidth” the client has.  In addition, please note the “Stop” button which you can use to terminate a backup or restore.

While a backup or restore is running, the lower half of the window shows information on the status of the current file being backed up, such as it’s name, size, and progress, as shown below.

At the very bottom of the window there is a table which will show issues, if any, which have occurred during the backup or restore so far.  In the example below a warning was thrown for the junction point “E:\test#123\mounted_vol”

Protecting Windows Server Disk Images with Onguard Remote Backup

Posted on

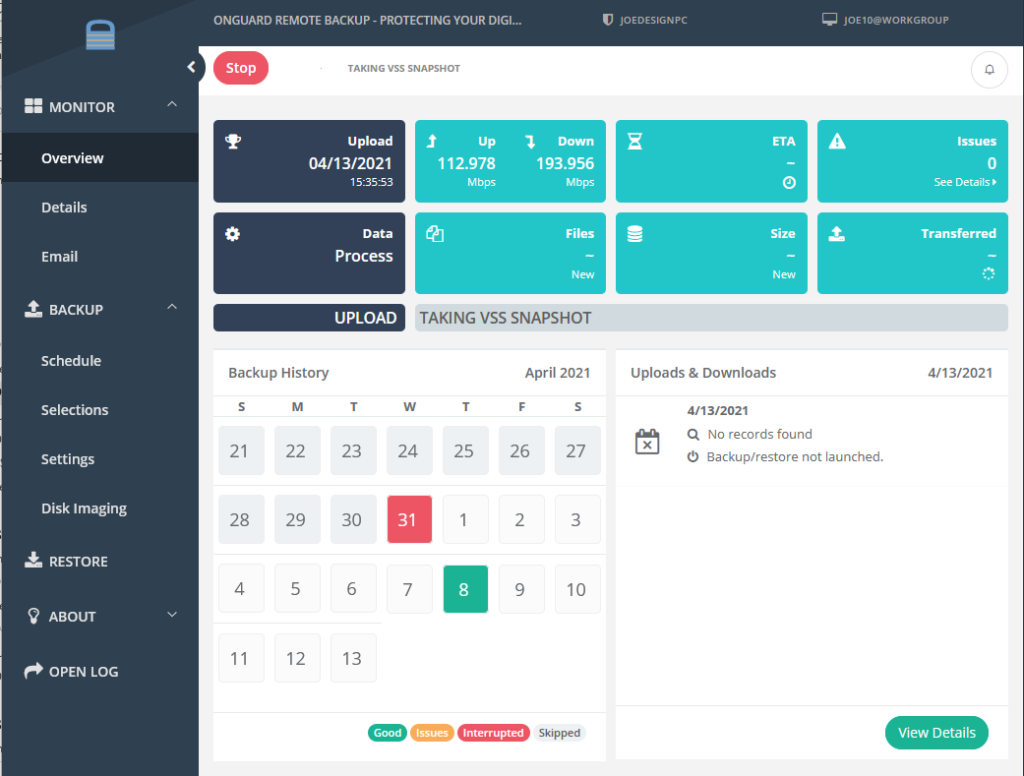
The Windows Disk Images tab allows you to perform a full bare metal recovery of your computer. Bare metal backup saves your current system state at the time the backup is run, allowing you to quicky go back to a point in time before an issue occurred. Onguard Remote Backup leverages the wbadmin command that is built in to Windows to make bare-metal disk images that are usable to recover a system through a Windows Recovery Environment.

Considerations:

  • The wbadmin command was introduced with Windows Server 2008 and Windows Vista, so earlier versions of Windows (XP/2003 and older) are not able to utilize this client-side feature.
  • The ‘backupTarget’ syntax designates the drive the disk images will be saved to.
  • The ‘include’ syntax allows for non-critical drives to be added to the disk images. If no non-critical drives are selected, it is not included in the syntax.
  • The ‘allCritical’ syntax is key for creating a system-restorable disk image backup.
  • The ‘vssFull’ syntax will be added if you have selected the VSS_FULL backup mode on the Expert Settings tab, which is visible when you enter Expert mode on the client.
  • The ‘quiet’ syntax prevents wbadmin from waiting for user input when performing the disk image backup.

When the Windows Disk Image backups are enabled, the above command will run with every scheduled backup, and it will save the disk images to the destination hard drive; it will create a WindowsImageBackup folder, that will contain sub-folders with the Windows disk image (.VHD), as well as many small meta-data files.

The destination drive can be either a local hard drive, network mapped drive, or (preferably) a local USB hard drive. A local drive is preferable to a network mapped drive because if it is done to a local drive, it will fully utilize VSS snapshots to keep a history of prior disk image backups. Done over the network, this is not possible, so only the latest disk image will be available.

When done to a local USB drive, it allows you to have a portable solution with multiple versions available for you to use in a Windows Recovery Environment to restore a system to its original hardware, or on to replacement hardware.

In addition to this local copy of the disk image, you can add the disk images to your backup selections to your Onguard Remote Backup Service.

The .VHD files associated with these disk image backups will be very large. On a very minimal Windows Server 2008 R2 install, the .VHD is over 25 GB. On a fully deployed server environment running services like SQL or Exchange, it will be much larger. You should account for this when you perform the initial remote backup for this data. One option would be to do a local seed that can then be moved to your remote server. Thankfully, these .VHD files perform well under differential scans, so after the initial seed the subsequent backups of the .VHDs will be quicker.

The initial time you run the disk image backup, it will take a long time to run. This is due to first the wbadmin command taking a long time to create the initial .VHD, and second the time it takes to compress and encrypt the .VHD. Please be sure to allow a few extra hours for the backup to run the first time a disk image backup is done.

Installing the Windows Server Backup Feature

Although wbadmin comes installed by default on consumer-grade Windows such as Windows 7, you need to ensure that the ‘Windows Server Backup’ features are installed on the server versions of Windows. To make sure you have the feature installed, you can check from the Server Manager:

1) Open Server Manager

2) Go to Features, click on ‘Add Features’

3) If ‘Windows Server Backup Features’ is not selected, select it and make sure ‘Command-line Tools’ is also selected.

4) If you had to select them, make sure to install the features.

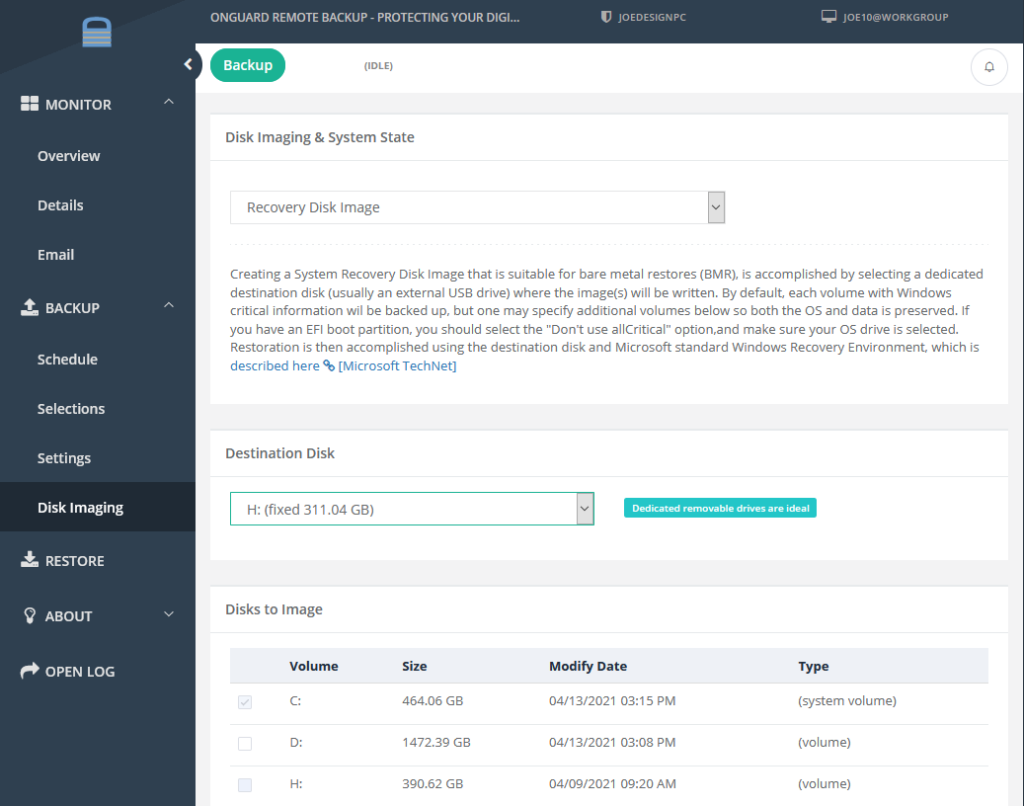
Enabling and Configuring Disk Images

To enable the disk images, check the ‘Enable Windows System Recovery’ option at the top of the Windows Disk Images tab.

This will then allow you to select the Destination disk, which may be any local drive attached to the computer. The destination disk can NOT be the same as one of the disks you intend to back up in this manner. This is another reason a USB hard drive is preferable.

With the Destination set, you should then select which other local drives you want backed up in the “Selected disk(s) to image” field. The Destination disk will be greyed out to prevent its selection. You also cannot deselect any critical system volumes (usually the C:\).

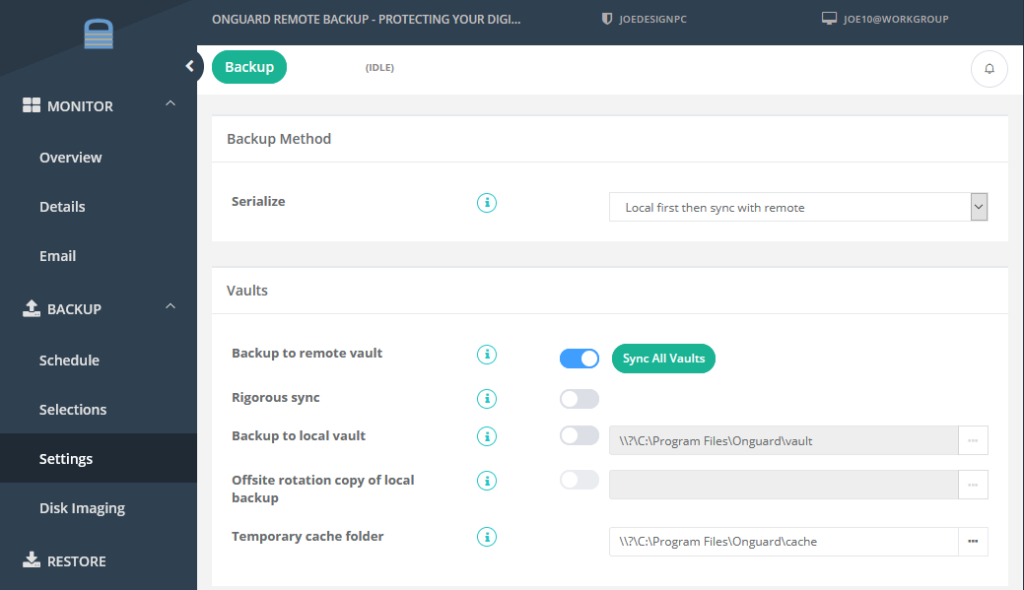
With the above options set, the Windows disk image backup will run with every scheduled backup, but it will be only to the local destination disk. If you want the disk images to be uploaded to your server, you will need to enable remote backups as described below.

Remotely Backing Up Windows Disk Images

With Windows disk images enabled, you are then able to add the disk image backups to your scheduled remote backup data set. This is done by selecting the days of the week you want the backup to be backed up remotely. Selecting Everyday, Weekday, or Weekend will select the appropriate individual days.

As with all large files, it will take a substantial amount of time for the backup process to compress, encrypt, and do a differential scan on the large .VHD file generated by the Windows disk image backup. This will be the case even after the initial backup of the .VHD, because the compression and encryption must be run each time a file is to be analyzed for backup.

You must ensure that there is enough free cache space available for the compression and encryption of the .VHD file can be done. It is recommended that there is 2.5 to 3 times as much free space available for cache space as the largest file that is being backed up, which is likely to be the .VHD file. It is a good idea to not include the Windows disk image backup in your remote backup set until you know the overall size of the .VHD.

Retention and Versions in Onguard Remote Backup

Posted on

The meaning of these settings is as follows.

At the end of a backup, a file retention rollup process takes place where the client determines what old versions of files it may delete from its own local backup folder as well as the Onguard Remote Backup Service.

If retention is a number greater then zero then the backup date of every file contained in the backup vault(s) is checked such that any versions of files backed up more then retention days ago are deleted if there exists one or more versions of those same files which have been backed up more recently in the vault(s).

Next, if version is a number greater then zero then a search is done for any files in the backup vault(s) where there exists more then version numbers of those files, and the oldest versions of those files are then deleted until there exists no more then version of them in the backup vault(s).

Please also check out the “preservedeleted” INI setting, which can also be selected interactively on the Expert Settings tab.

Differential, Incremental, and Full Backup in Onguard Remote Backup

Posted on

Onguard Remote Backup uses delta-block differential methods to perform backups.

  1. At backup time the client’s selections are processed and the file system modify time stamp and file size for each file is compared with the corresponding values from the last backup.
  2. For files whose size or modify date has changed (and for all SQL Server and Hyper-V .VHD files selected, whether or not their date or size has changed), the file is
    (a) compressed
    (b) encrypted using AES-256 block encryption and
    (c) broken up into 1MB blocks.
  3. Any blocks in step 2, which have not already been backed up, are backed up.In this way, only changed blocks need to be transferred to the backup server and only one copy of each block needs to be kept (thus the blocks are de-duplicated).  And in this way all backups are actually differential backups.

    Care is taken to preserve the history of files and blocks which are backed up and retained.  This meta-data is stored in small databases which are backed up with each of your backups and 30 days worth of versions of these databases are retained in each local and remote backup store.  You can find these files in your local, auxiliary, or remote backup vaults in the meta subfolder (where the actual blocks are stored in the vault subfolder).  In fact your INI and SEL files, as well as your encrypted key file, is also backed up in a similar manner, to help protect your backups from malware such as CryptoLocker and other infections.

    The Backup->Settings tab provides the means to synchronize all blocks between your backup vault(s) using the “Synchronize all backup vaults…” button.  This process is performed automatically at the end of each backup anyways.

  1. In addition, when the Onguard Remote Backup GUI is launched in expert mode, an additional button appears on the bottom of the Backup->Schedule tab which allows you to force a Full backup, thereby backing up every file and block as if the client were just installed and performing its first backup.  This option is provided if you suspect that all of our backup vault(s), both remote and local, have been corrupted.

What you need to know about DocuChest

Posted on

DocuChest brings all of your photos, documents, even music anywhere you are. Any file saved to your DocuChest will automatically be accessible from any computer, iPhone, iPad, android phone, Mac and even Linux systems. If your computer has a meltdown, your stuff is always safe in DocuChest. Never lose another file again. Never email yourself a file again – take your office with you  – update and upload files to your DocuChest and they will be automatically synced to your pc.

The DocuChest client easily syncs your documents, music & photos – nearly anything that you would need access to. You can flip through all your photos or review that spreadsheet even while on the road. DocuChest lets you work from any mobile device or pc with the confidence that you’ll always have everything you need. DocuChest allows you to send links of specific files to your colleagues making DocuChest perfect for team projects and remote collaboration. Send only the files you want to share.

See all the features here and sign up today for your FREE account. Larger file storage and teams can sign up for our premium accounts.

[su_tabs]

[su_tab title=”Instruction Manual in HTML”]

How to use DocuChest

Logging In

You can connect to DocuChest with your web browser by following the steps listed below. When you enter the URL, you will receive a page that is similar to the one depicted:

  1. Open your web browser, and go to http://www.docuchest.com
  2. Enter your username and password into the area provided.
  3. Click Log In to continue.


Overview

The DocuChest main interface with essential web interface elements numbered:


The web interface comprises of the following items:

  1. Navigation bar: Allows navigation between different parts of DocuChest.
  2. Application view: This is where your content will appear.
  3. Upload/New button: This allows you to create new files or upload existing ones from your device. Note that you can also drop files from Explorer or Finder onto the DocuChest file view and they will get uploaded to DocuChest.
  4. Search/Logout: Search allows you to look for files and directories.
  5. Settings: This button provides access to the settings menu, where you can change your personal settings, such as the interface language or your password. You can also retrieve the WebDAV URL and show your quota.

Modifying your profile

  1. Select the arrow next to your username to display the profile menu
  2. Select Personal to modify your profile.


  1. Password: you can change your password. Enter your current password and your new desired password and click the change password button.
  2. Display Name: Enter a new display name and then click the Change Display Name Button.
  3. Email: enter your preferred email address to be used for password recovery.
  4. Language: Select your preferred language.
  5. WebDAV: Copy and paste this link to access your remote storage through windows explorer.
  6. Media: Copy and paste this link to stream music from your music library.


Uploading Music

  1. Select Files from the left menu.
  2. Click the upload button. Note that the maximum file size per upload is 800 MB


  1. The file upload window will appear. Browse to the location of your music file.
  2. Select the desired file and then click open.


  1. Once uploaded, you can then select the music library on the left navigation pane. Inside the music library you have the ability to stream your music right from DocuChest!

Creating a NEW text file

  1. Select Files from the left menu.
  2. Click New


  1. Select Text File.
  2. Enter a new file name.


Creating a NEW folder

  1. Select Files from the left menu.
  2. Click New


  1. Select Folder.
  2. Enter a new folder name


Managing your contacts

The contacts area of DocuChest allows you to create and manage a contacts list. You can also add additional address books in order to keep your contacts organized.

Adding contacts: There are two ways in which you can add contacts

  1. Add them manually
  2. Import a VCF file

Importing

  1. On the left menu, select contacts.
  2. In the contacts app, select the import button.
  3. Click the select files to import button
  4. Locate the folder containing your VCF files.
  5. Click open.


Create Contacts Manually

  1. On the left menu, select contacts.
  2. In the contacts app, select the add contact button.
  3. Add all your information about the contact: the name, the address, the e-mail, the telephone etc…


Managing your calendar

If you use the calendar the first time, there will be already a calendar called “Default calendar”. You can manage your calendars with a click on the “Calendar” button in the top right corner. In the dialog, which will appear, you can add, edit, export, enable, disable and delete your calendars.


Adding an appointment


Uploading Pictures

  1. Select Files from the left menu.
  2. Click the upload button. Note that the maximum file size per upload is 800 MB.


  1. The file upload window will appear. Browse to the location of your music file.
  2. Select the desired file and then click open.


  1. Once the upload completes, you can view your images from within the pictures library. Click pictures on the left navigation to view the pictures library.


Back to Top

[/su_tab]

[su_tab title=”Video Instructions”]

 How to install DocuChest client on…

Windows

http://www.youtube.com/watch?v=6AB6KmeFnDs&feature=youtu.be

 OS X

http://www.youtube.com/watch?v=3hYaEmYcnOY

iPhone

http://www.youtube.com/watch?v=pwf99-l_050&feature=youtu.be

Synchronize Local folders from a Windows PC

http://www.youtube.com/watch?v=PiX8rlzIE8c&feature=youtu.be

File Features Explored

http://www.youtube.com/watch?v=zYLX6v0FEII&feature=youtu.be

[/su_tab]

[/su_tabs]